Dev Services and UI for OpenID Connect (OIDC)
This guide covers the Dev Services and UI for OpenID Connect (OIDC) Keycloak provider and explains how to support Dev Services and UI for other OpenID Connect providers. It also describes Dev UI for all OpenID Connect providers which have already been started before Quarkus is launched in a dev mode.
Introduction
Quarkus provides Dev Services For Keycloak feature which is enabled by default when the quarkus-oidc extension is started in dev mode and when the integration tests are running in test mode, but only when no quarkus.oidc.auth-server-url property is configured.
It starts a Keycloak container for both the dev and/or test modes and initializes them by registering the existing Keycloak realm or creating a new realm with the client and users for you to start developing your Quarkus application secured by Keycloak immediately. It will restart the container when the application.properties or the realm file changes have been detected.
Additionally, Dev UI available at /q/dev complements this feature with a Dev UI page which helps to acquire the tokens from Keycloak and test your Quarkus application.
If quarkus.oidc.auth-server-url is already set then a generic OpenID Connect Dev Console which can be used with all OpenID Connect providers will be activated, please see Dev UI for all OpenID Connect Providers for more information.
Dev Services for Keycloak
Start your application without configuring quarkus.oidc properties in application.properties with:
quarkus dev./mvnw quarkus:dev./gradlew --console=plain quarkusDevYou will see in the console something similar to:
KeyCloak Dev Services Starting:
2021-11-02 17:14:24,864 INFO  [org.tes.con.wai.str.HttpWaitStrategy] (build-10) /unruffled_agnesi: Waiting for 60 seconds for URL: http://localhost:32781 (where port 32781 maps to container port 8080)
2021-11-02 17:14:44,170 INFO [io.qua.oid.dep.dev.key.KeycloakDevServicesProcessor] (build-10) Dev Services for Keycloak started.|
When logging in the Keycloak admin console, the username is |
Note that by default, Dev Services for Keycloak will not start a new container if it finds a container with a quarkus-dev-service-keycloak label and connect to it if this label’s value matches the value of the quarkus.keycloak.devservices.service-name property (default value is quarkus). In such cases you will see a slightly different output when running:
quarkus dev./mvnw quarkus:dev./gradlew --console=plain quarkusDev2021-08-27 18:42:43,530 INFO [io.qua.dev.com.ContainerLocator] (build-15) Dev Services container found: 48fee151a31ddfe32c39965be8f61108587b25ed2f66cdc18bb926d9e2e570c5 (quay.io/keycloak/keycloak:21.0.2). Connecting to: 0.0.0.0:32797.
2021-08-27 18:42:43,600 INFO [io.qua.oid.dep.dev.key.KeycloakDevServicesProcessor] (build-15) Dev Services for Keycloak started.
...|
It is possible that the Keycloak container does not become ready before the default timeout of 60 seconds. A simple way to overcome the issue is to increase the time out - for example to 2 minutes - using |
Note that you can disable sharing the containers with quarkus.keycloak.devservices.shared=false.
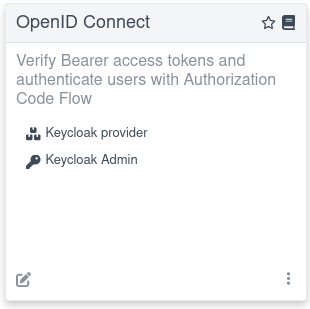
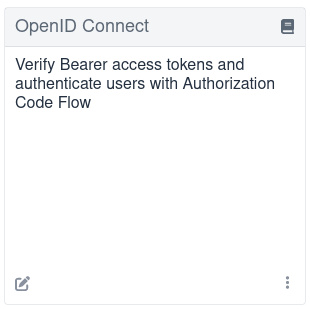
Now open the main Dev UI page, and you will see the OpenID Connect Card linking to a Keycloak page:
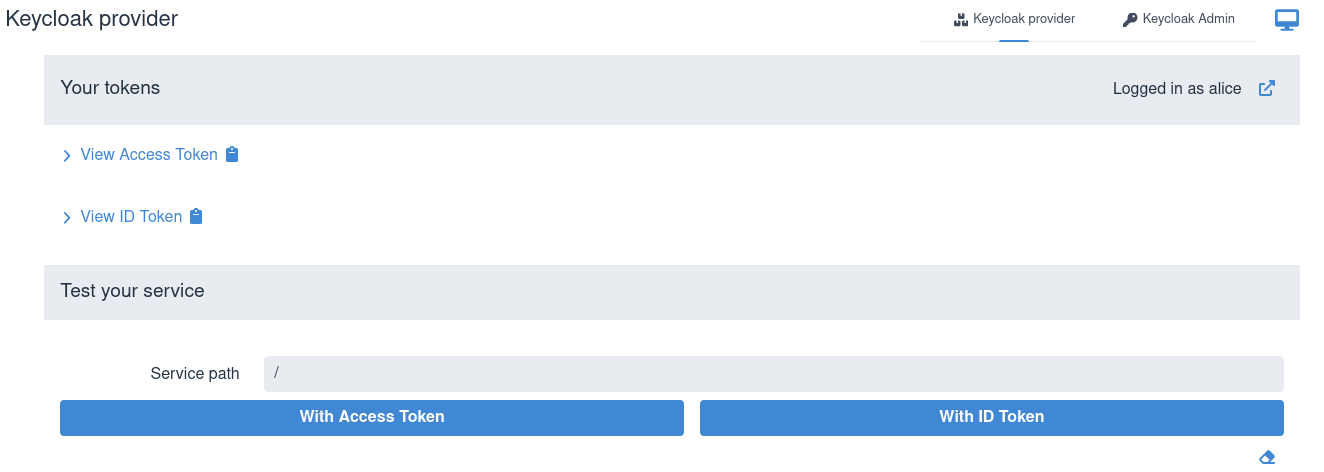
Click on the Provider: Keycloak link, and you will see a Keycloak page which will be presented slightly differently depending on how Dev Services for Keycloak feature has been configured.
Developing Service Applications
By default, the Keycloak page can be used to support the development of a Quarkus OIDC service application.
Authorization Code Grant
If you set quarkus.oidc.devui.grant.type=code in application.properties (this is a default value) then an authorization_code grant will be used to acquire both access and ID tokens. Using this grant is recommended to emulate a typical flow where a Single Page Application acquires the tokens and uses them to access Quarkus services.
First you will see an option to Log into Single Page Application:

Choose Keycloak realm and client id which will be used during the authentication process.
|
This SPA represents a public OpenId Connect client therefore the client IDs you enter should identify public Keycloak clients which have no secrets. This is because SPA is not a web application and can not securely handle secrets which it will need to complete the authorization code flow if the client secret is also expected to complete the authorization code flow. The clients requiring secrets can only be supported with this SPA if a default realm has been created or if |
Next, after selecting Log into Single Page Application, you will be redirected to Keycloak to authenticate, example, as alice:alice and then returned to the page representing the SPA:
You can view the acquired access and ID tokens, for example:
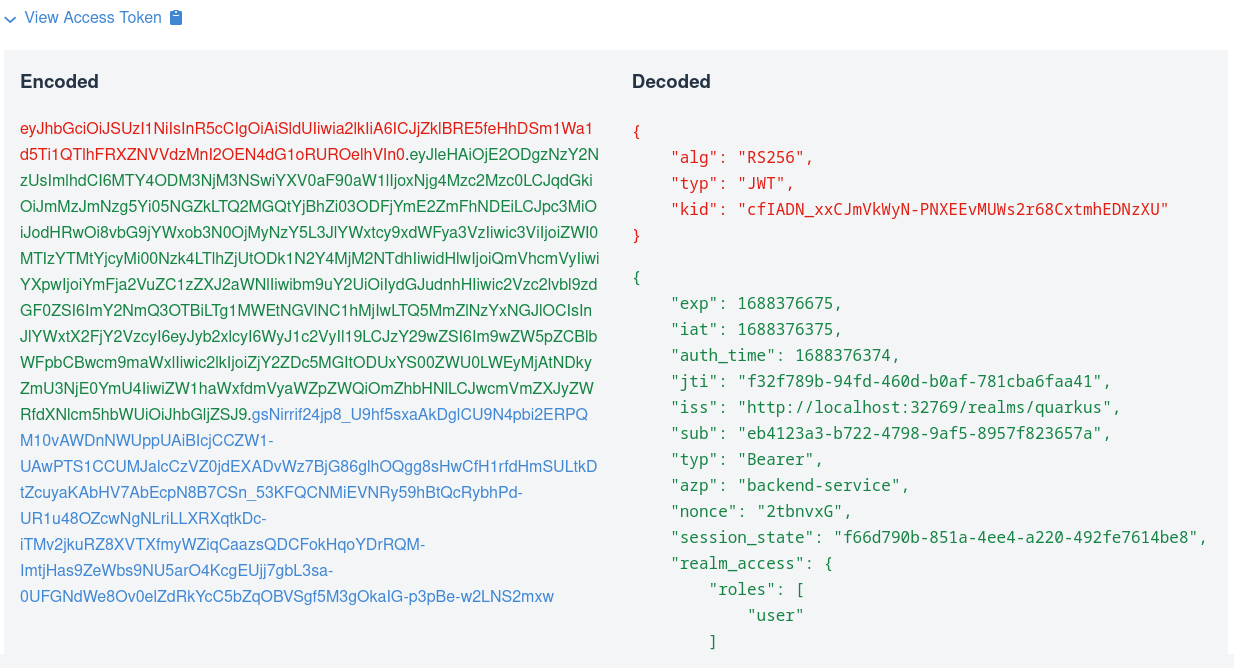
This view shows the encoded JWT token on the left-hand side and highlights the headers (red colour), payload/claims (green colour) and signature (blue colour). It also shows the decoded JWT token on the right-hand side where you can see the header and claim names and their values.
Next test the service by entering a relative service path and sending a token. SPA usually sends access tokens to the application endpoint, so choose Test with Access Token option, for example:
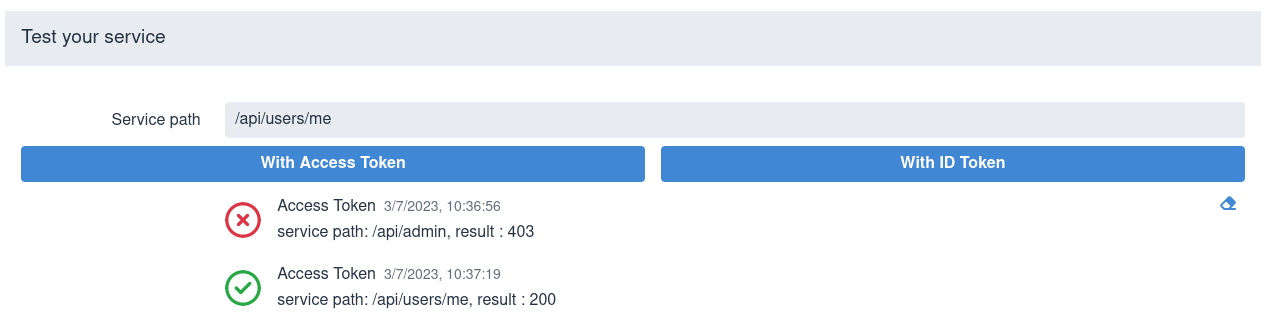
You can use an eraser symbol in the right bottom corner to clear the test results area.
Sometimes ID tokens are forwarded to the application frontends as bearer tokens as well for the endpoints be aware about the user who is currently logged into SPA or to perform an out-of-band token verification. Choose Test with ID Token option in such cases.
Manually entering the service paths is not ideal, so please see the Test with Swagger UI or GraphQL UI section about enabling Swagger or GraphQL UI for testing the service with the access token already acquired by OIDC Dev UI.
Finally, you can select a Log Out image::dev-ui-keycloak-logout.png option if you’d like to log out and authenticate to Keycloak as a different user.
Note Keycloak may return an error when you try to Log into Single Page Application. For example, quarkus.oidc.client-id may not match the client id in the realm imported to Keycloak or the client in this realm is not configured correctly to support the authorization code flow, etc. In such cases Keycloak will return an error_description query parameter and Dev UI will also show this error description, for example:

If the error occurs then log into Keycloak using the Keycloak Admin option and update the realm configuration as necessary and also check the application.properties.
Test with Swagger UI or GraphQL UI
You can avoid manually entering the service paths and test your service with Swagger UI or GraphQL UI if quarkus-smallrye-openapi and/or quarkus-smallrye-graphql are used in your project. For example, if you start Quarkus in dev mode with both quarkus-smallrye-openapi and quarkus-smallrye-graphql dependencies then you will see the following options after logging in into Keycloak:

For example, clicking on Swagger UI will open Swagger UI in a new browser tab where you can test the service using the token acquired by Dev UI for Keycloak.
and Swagger UI will not try to re-authenticate again. Do not choose a Swagger UI Authorize option once you are in Swagger UI since OIDC Dev UI has done the authorization and provided the access token for Swagger UI to use for testing.
Integration with GraphQL UI works in a similar way, the access token acquired by Dev UI for Keycloak will be used.
|
You may need to register a redirect URI for the authorization code flow initiated by Dev UI for Keycloak to work because Keycloak may enforce that the authenticated users are redirected only to the configured redirect URI. It is recommended to do in production to avoid the users being redirected to the wrong endpoints which might happen if the correct If Keycloak does enforce it then you will see an authentication error informing you that the In this case select the If the container is shared between multiple applications running on different ports then you will need to register You can set the
|
Implicit Grant
If you set quarkus.oidc.devui.grant.type=implicit in application.properties then an implicit grant will be used to acquire both access and ID tokens. Use this grant for emulating a Single Page Application only if the authorization code grant does not work (for example, a client is configured in Keycloak to support an implicit grant, etc).
Password Grant
If you set quarkus.oidc.devui.grant.type=password in application.properties then you will see a screen like this one:
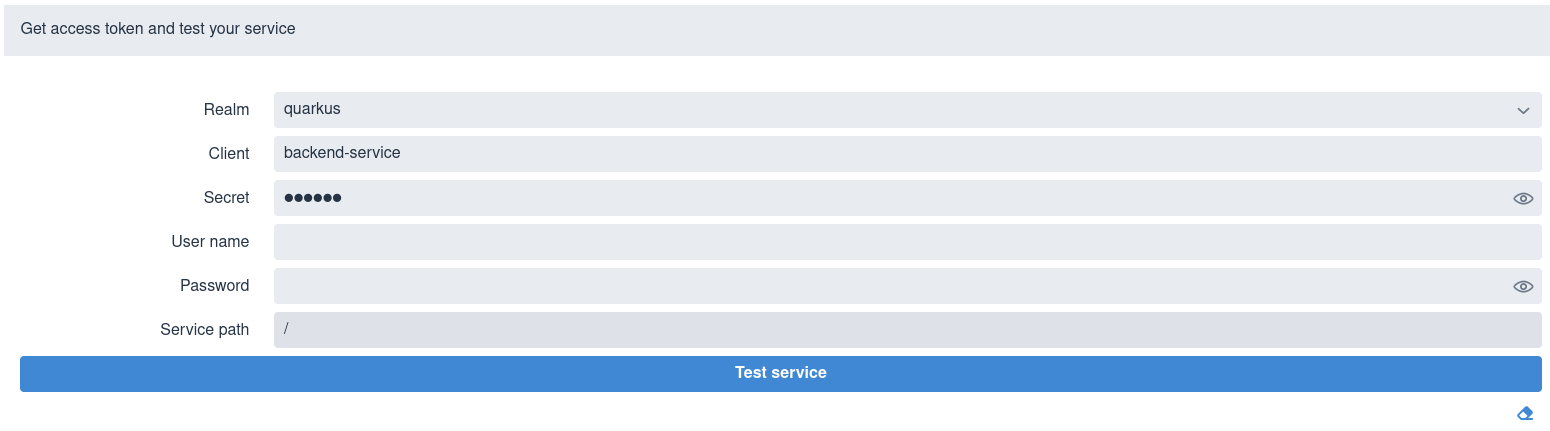
Select a realm, enter client id and secret, username amd user password, a relative service endpoint path, click on Test Service and you will see a status code such as 200, 403, 401 or 404 printed.
If the username is also set in quarkus.keycloak.devservices.users map property containing usernames and passwords then you do not have to set a password when testing the service.
But note, you do not have to initialize quarkus.keycloak.devservices.users to test the service using the password grant.
You will also see in the Dev UI console something similar to:
2021-07-19 17:58:11,407 INFO  [io.qua.oid.dep.dev.key.KeycloakDevConsolePostHandler] (security-openid-connect-quickstart-dev.jar) (DEV Console action) Using password grant to get a token from 'http://localhost:32818/realms/quarkus/protocol/openid-connect/token' for user 'alice' in realm 'quarkus' with client id 'quarkus-app'
2021-07-19 17:58:11,533 INFO  [io.qua.oid.dep.dev.key.KeycloakDevConsolePostHandler] (security-openid-connect-quickstart-dev.jar) (DEV Console action) Test token: eyJhbGciOiJSUzI1NiIsInR5cCIgOiAiSldUIiwia2lkIiA6ICJ6Z2tDazJQZ1JaYnVlVG5kcTFKSW1sVnNoZ2hhbWhtbnBNcXU0QUt5MnJBIn0.ey...
2021-07-19 17:58:11,536 INFO  [io.qua.oid.dep.dev.key.KeycloakDevConsolePostHandler] (security-openid-connect-quickstart-dev.jar) (DEV Console action) Sending token to 'http://localhost:8080/api/admin'
2021-07-19 17:58:11,674 INFO  [io.qua.oid.dep.dev.key.KeycloakDevConsolePostHandler] (security-openid-connect-quickstart-dev.jar) (DEV Console action) Result: 200
A token is acquired from Keycloak using a password grant and is sent to the service endpoint.
Client Credentials Grant
If you set quarkus.oidc.devui.grant.type=client then a client_credentials grant will be used to acquire a token, with the page showing no User field in this case:
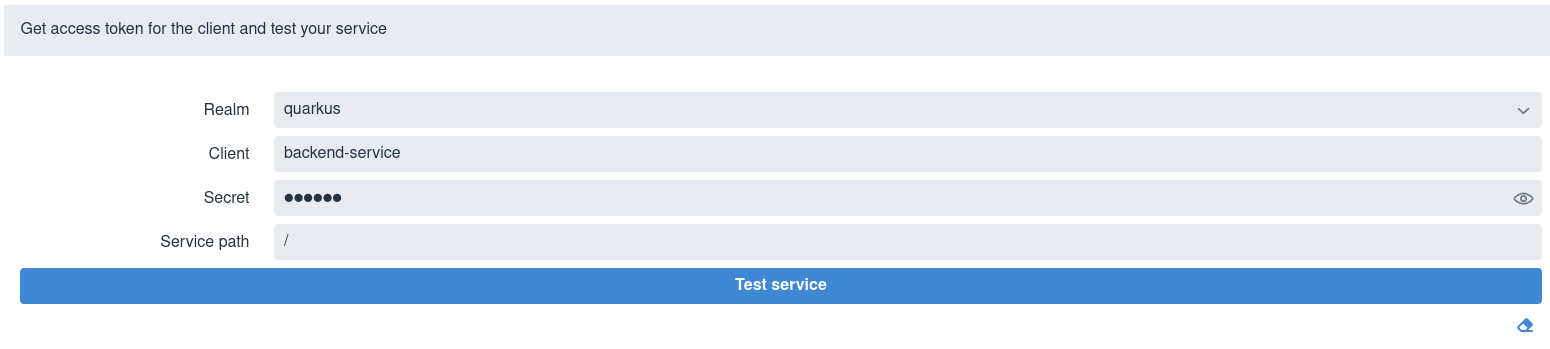
Select a realm, enter the client id and secret, a relative service endpoint path, click on Test Service and you will see a status code such as 200, 403, 401 or 404 printed.
Developing OpenID Connect Web App Applications
If you develop a Quarkus OIDC web-app application, then you should set quarkus.oidc.application-type=web-app in application.properties before starting the application.
You will see a screen like this one:

Set a relative service endpoint path, click on Sign In To Service and you will be redirected to Keycloak to enter a username and password in a new browser tab and get a response from the Quarkus application.
Note that in this case Dev UI does not really enrich a dev experience since it is a Quarkus OIDC web-app application which controls the authorization code flow and acquires the tokens.
To make Dev UI more useful for supporting the development of OIDC web-app applications you may want to consider setting profile specific values for quarkus.oidc.application-type:
%prod.quarkus.oidc.application-type=web-app
%test.quarkus.oidc.application-type=web-app
%dev.quarkus.oidc.application-type=service
It will ensure that all Dev UI options described in Developing OpenID Connect Service Applications will be available when your web-app application is run in dev mode. The limitation of this approach is that both access and ID tokens returned with the code flow and acquired with Dev UI will be sent to the endpoint as HTTP Bearer tokens - which will not work well if your endpoint requires the injection of IdToken.
However, it will work as expected if your web-app application only uses the access token, for example, as a source of roles or to get UserInfo, even if it is assumed to be a service application in dev mode.
Even a better option is to use a hybrid application type in devmode:
%prod.quarkus.oidc.application-type=web-app
%test.quarkus.oidc.application-type=web-app
%dev.quarkus.oidc.application-type=hybrid
It will ensure that if you access the application from the browser in dev mode, without using OIDC DevUI, then Quarkus OIDC will also perform the authorization code flow as in the production mode. But OIDC DevUI will also be more useful because hybrid applications can accept the bearer access tokens as well.
Running the tests
You can run the tests against a Keycloak container started in a test mode in a Continuous Testing mode.
It is also recommended to run the integration tests against Keycloak using Dev Services for Keycloak.
For more information, see Testing OpenID onnect Service Applications with Dev Services and Testing OpenID Connect WebApp Applications with Dev Services.
Keycloak Initialization
The quay.io/keycloak/keycloak:22.0.1 image which contains a Keycloak distribution powered by Quarkus is used to start a container by default.
quarkus.keycloak.devservices.image-name can be used to change the Keycloak image name. For example, set it to quay.io/keycloak/keycloak:19.0.3-legacy to use a Keycloak distribution powered by WildFly.
Note that only a Quarkus based Keycloak distribution is available starting from Keycloak 20.0.0.
Dev Services for Keycloak will initialize a launched Keycloak server next.
By default, the quarkus, quarkus-app client with a secret password, alice and bob users (with the passwords matching the names), and user and admin roles are created, with alice given both admin and user roles and bob - the user role.
Usernames, secrets and their roles can be customized with quarkus.keycloak.devservices.users (the map which contains usernames and secrets) and quarkus.keycloak.devservices.roles (the map which contains usernames and comma separated role values).
For example:
%dev.quarkus.keycloak.devservices.users.duke=dukePassword
%dev.quarkus.keycloak.devservices.roles.duke=reader
%dev.quarkus.keycloak.devservices.users.john=johnPassword
%dev.quarkus.keycloak.devservices.roles.john=reader,writer
This configuration creates two users:
* duke with a dukePassword password and a reader role
* john with a johnPassword password and reader and writer roles
quarkus.oidc.client-id and quarkus.oidc.credentials.secret can be used to customize the client id and secret.
However, it is likely your Keycloak configuration may be more complex and require setting more properties.
This is why quarkus.keycloak.devservices.realm-path is always checked first before trying to initialize Keycloak with the default or configured realm, client, user and roles properties. If the realm file exists on the file system or classpath then only this realm will be used to initialize Keycloak, for example:
quarkus.keycloak.devservices.realm-path=quarkus-realm.jsonYou can use quarkus.keycloak.devservices.realm-path to initialize Keycloak with multiple realm files by providing a comma-separated list of files:
quarkus.keycloak.devservices.realm-path=quarkus-realm1.json,quarkus-realm2.json
Also, the Keycloak page offers an option to Sign In To Keycloak To Configure Realms using a Keycloak Admin option in the right top corner:

Sign in to Keycloak as admin:admin in order to further customize the realm properties, create or import a new realm, export the realm.
Disable Dev Services for Keycloak
Dev Services For Keycloak will not be activated if either quarkus.oidc.auth-server-url is already initialized or the default OIDC tenant is disabled with quarkus.oidc.tenant.enabled=false, irrespectively of whether you work with Keycloak or not.
If you prefer not to have a Dev Services for Keycloak container started or do not work with Keycloak then you can also disable this feature with quarkus.keycloak.devservices.enabled=false - it will only be necessary if you expect to start quarkus:dev without quarkus.oidc.auth-server-url.
The main Dev UI page will include an empty OpenID Connect Card when Dev Services for Keycloak is disabled and the quarkus.oidc.auth-server-url property
has not been initialized:
If quarkus.oidc.auth-server-url is already set then a generic OpenID Connect Dev Console which can be used with all OpenID Connect providers may be activated, please see Dev UI for all OpenID Connect Providers for more information.
Dev UI for all OpenID Connect Providers
If quarkus.oidc.auth-server-url points to an already started OpenID Connect provider (which can be Keycloak or other provider), quarkus.oidc.auth-server-url is set to service (which is a default value) or hybrid and at least quarkus.oidc.client-id is set then Dev UI for all OpenID Connect Providers will be activated.
Setting quarkus.oidc.credentials.secret will mostly likely be required for Keycloak and other providers for the authorization code flow initiated from Dev UI to complete, unless the client identified with quarkus.oidc.client-id is configured as a public client in your OpenID Connect provider’s administration console.
For example, you can use Dev UI to test Google authentication with this configuration:
quarkus.oidc.provider=google
quarkus.oidc.application-type=hybrid
quarkus.oidc.client-id=${google-client-id}
quarkus.oidc.credentials.secret=${google-client-secret}
Run:
quarkus dev./mvnw quarkus:dev./gradlew --console=plain quarkusDevAnd you will see the following message:
...
2021-09-07 15:53:42,697 INFO  [io.qua.oid.dep.dev.OidcDevConsoleProcessor] (build-41) OIDC Dev Console: discovering the provider metadata at https://accounts.google.com/.well-known/openid-configuration
...
If the provider metadata discovery has been successful then, after you open the main Dev UI page, you will see the following OpenID Connect Card referencing a Google provider:
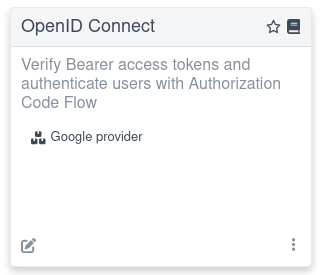
Follow the link, and you will be able to log in to your provider, get the tokens and test the application. The experience will be the same as described in the Authorization Code Grant for Keycloak section, where Dev Services for Keycloak container has been started, especially if you work with Keycloak.
You will most likely need to configure your OpenId Connect provider to support redirecting back to the Dev Console. Add http://localhost:8080/q/dev-ui/io.quarkus.quarkus-oidc/`providerName-provider` as one of the supported redirect and logout URLs, where providerName will need to be replaced by the name of the provider shown in DevUI, for example, auth0.
If you work with other providers then a Dev UI experience described in the Authorization Code Grant for Keycloak section might differ slightly. For example, an access token may not be in a JWT format, so it won’t be possible to show its internal content, though all providers should return an ID Token as JWT.
|
The current access token is used by default to test the service with |
Some providers such as Auth0 do not support a standard RP initiated logout so the provider specific logout properties will have to be configured for a logout option be visible. For more information, see OpenID Connect User-Initiated Logout.
Similarly, if you’d like to use a password or client_credentials grant for Dev UI to acquire the tokens then you may have to configure some extra provider specific properties, for example:
quarkus.oidc.devui.grant.type=password
quarkus.oidc.devui.grant-options.password.audience=http://localhost:8080
Dev Services and UI Support for other OpenID Connect Providers
Your custom extension would need to extend quarkus-oidc and add the dependencies required to support your provider to the extension’s deployment module only.
The build step dealing with the Dev Services should additionally register two runtime properties into the "io.quarkus.quarkus-oidc" namespace: oidcProviderName (for example, Google) and oidcProviderUrlBase (for example: mycompany.devservices-google) for the OpenID Connect Card to link to the Dev UI page representing your provider, for example:
package io.quarkus.oidc.okta.runtime;

import java.util.function.Supplier;

import io.quarkus.runtime.annotations.Recorder;

// This simple recorder is the only code which will be located in the extension's `runtime` module
@Recorder
public class OktaDevServicesRecorder {

    public Supplier<String> getProviderName() {
        return new Supplier<String>() {

            @Override
            public String get() {
                return "OKTA";
            }
        };
    }

    public Supplier<String> getProviderUrlBase() {
        return new Supplier<String>() {

            @Override
            public String get() {
                return "io.quarkus" + "." + "quarkus-oidc-okta";
            }
        };
    }
}


package io.quarkus.oidc.okta.deployment.devservices;

import static io.quarkus.deployment.annotations.ExecutionTime.RUNTIME_INIT;

import java.util.Optional;

import io.quarkus.deployment.IsDevelopment;
import io.quarkus.deployment.annotations.BuildProducer;
import io.quarkus.deployment.annotations.BuildStep;
import io.quarkus.deployment.annotations.Consume;
import io.quarkus.deployment.annotations.Record;
import io.quarkus.deployment.builditem.RuntimeConfigSetupCompleteBuildItem;
import io.quarkus.devconsole.spi.DevConsoleRouteBuildItem;
import io.quarkus.devconsole.spi.DevConsoleRuntimeTemplateInfoBuildItem;

public class OktaDevConsoleProcessor {

    @BuildStep(onlyIf = IsDevelopment.class)
    @Record(value = RUNTIME_INIT)
    public void setOidcProviderProperties(BuildProducer<DevConsoleRuntimeTemplateInfoBuildItem> provider,
            OktaDevServicesRecorder recorder,
            Optional<DevServicesConfigBuildItem> configProps) {
        if (configProps.isPresent()) {
            provider.produce(new DevConsoleRuntimeTemplateInfoBuildItem("io.quarkus", "quarkus-oidc", "oidcProviderName",
                    recorder.getProviderName()));
            provider.produce(new DevConsoleRuntimeTemplateInfoBuildItem("io.quarkus", "quarkus-oidc", "oidcProviderUrlBase",
                    recorder.getProviderUrlBase()));
        }
    }
}
Additionally, the extension should produce a io.quarkus.oidc.deployment.devservices.OidcProviderBuildItem to disable the default Dev Services for Keycloak, instead of the users having to type quarkus.keycloak.devservices.enabled=false.
Please follow the Dev UI tutorial as well as check the extensions/oidc/deployment sources for more ideas.
Non Application Root Path Considerations
This document refers to the http://localhost:8080/q/dev-v1 Dev UI URL in several places where q is a default non application root path. If you customize quarkus.http.root-path and/or quarkus.http.non-application-root-path properties then replace q accordingly, please see Path Resolution in Quarkus for more information.
